Auto-scheduling
Quickly timebox tasks to the calendar with keyboard shortcut X.
How to auto-schedule
There are two ways to auto-schedule a task:
- Hover over or click on a task and press the
Xkey. - Right-click on a task and select “Add to calendar”.
Setting up schedules
Configure when Sunsama can auto-schedule tasks by going to Settings > Schedules. Here you can define your default working hours and set up custom per-channel schedules.
Sunsama will not schedule tasks outside of your schedules unless you tell it to.
Auto-scheduling around calendar events
Sunsama will not auto-schedule tasks to overlap with any events on your calendar. If needed, it may split tasks across multiple time blocks to fit them in.
Auto-scheduling does not consider declined meetings or events marked as “available” or “free”.
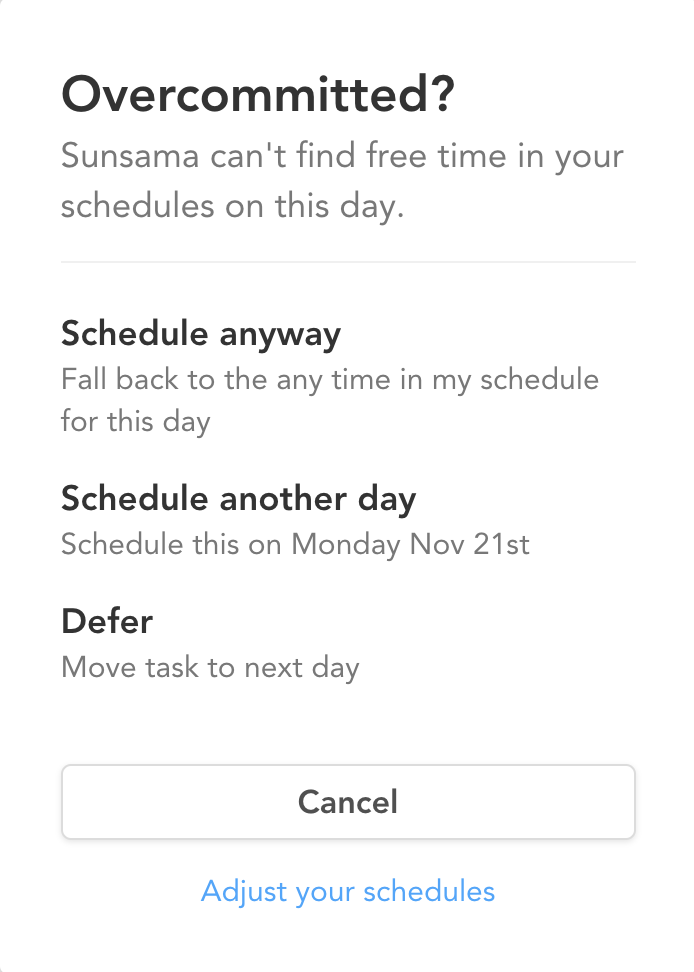
Overcommitted?
When there is no available time to schedule a task, three options appear:
- Schedule anyway: Ignores your schedule settings and schedules the task as soon as possible.
- Schedule another day: Moves the task to a future day if the current day is unavailable.
- Defer: Moves the task to tomorrow without attempting to schedule it.
Splitting tasks around events
- Tasks of 1 hour or less will only be split if necessary.
- Tasks of more than 1 hour will be readily split to fill available time blocks.
- Hold
Shift+Xto prevent splitting.
Recurring tasks with an “at roughly” time
If a recurring task has an “at roughly” time set, Sunsama will schedule it at the specified time if available. Otherwise, it schedules it as close as possible to that time without using past times.
Meeting scheduling logic
Auto-scheduling avoids overlapping with calendar events marked as busy, except for declined meetings. If your calendar has events that are just annotations and should not block time, mark those events as “free” or “available” so the auto-scheduler can schedule over them.